HITEC Bag for Grain


HITEC Bag for Grain


Higher capacity
Better feed quality
Exceptional protection
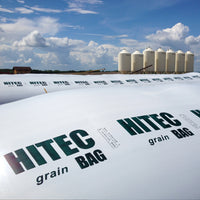
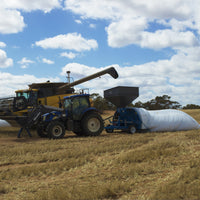
The HITEC Bag is an excellent solution for storing grains (Wheat, Barley, Sorghum, Maize, Soybean, Rice, Oats, Rye, Legumes, etc) that has become increasingly popular all over the world. The grain can be loaded in the bag directly from the harvester or from a truck and be stored safely for up to 2 years. The Hitec Bag creates a hermetic environment that promotes oxygen depletion and simultaneous carbon dioxide production as a result of the respiratory process of the biotic components inside the bag (grain, fungi, insects, etc). The new atmosphere, rich in CO2 and poor in O2, suppresses, deactivates, or reduces not only the reproduction and/or development capacity of insects and fungi but also the grain’s own activity thus facilitating its preservation.
Using Hitec Bag for grain storage offers the following benefits compared to traditional storage methods (commercial silos/elevators, on-farm grain bins):
- Lower initial investment (in machinery, not structures), no tied-up capital
- Bags represent the actual harvest cost, further investment (i.e. grain bins) is not needed
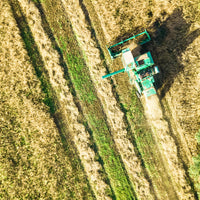
- Faster, uninterrupted harvest independent from weather conditions, transportation availability and elevator bottlenecks
- Unlimited on-site storage, flexible capacity depending on yield – storage is now a variable cost
- Savings on freight to collection point
- Flexibility in storage and marketing of the grain
- Control over price and market fluctuations
- Higher grain quality and smaller losses due to spoilage
- Quality and variety separation
- Thickness range: 180-305mic (7-12mil)
- Diameter range: 1.80-4.30m (6-14ft)
- Length range: 30-152m (100-500ft)
Approximate bag capacity
Grain should be ideally bagged at moisture levels of 12-14% and not higher than 16%. The levels may vary slightly depending on the kind of grain.

The Ground Footprint is the total length of the curve that the bag forms over the ground from side to side and it is used by some users to assess the filling uniformity. The data below is indicative and will vary depending on the bagging machine used, the material bagged and the packing pressure.

Instructions for Use
Bags should be placed on high and well drained fields with a slight slope. Ground preparation is very important. The soil must be leveled, dry, firm and clean from branches, rocks, water, grain from previous bags, etc. The bag must ideally be placed away from trees and bushes, in the North-South direction so that the sun hits it from both sides during the day.
There is an arrow on the bag box showing the direction of the black folds. Position the box in front of the bagger so that the black folds arrow faces:
- away from the tunnel in the case of Grain Bags
- towards the tunnel in the case of Silage Bags
Remove the Hitec Bag from its box by cutting any bands or cords that secure the box. Do not cut the remaining blue cords until the bag is loaded on the tunnel. Locate the “Top center of bag” sticker which should be visible at the top. Unfold the bag to a flat lying position, making sure that the sticker ends up in the middle.
Lift the bag onto the bag loading cradle. This will position the logo and fill bar indicator at about the 10 o’clock position (left side) for Grain Bags or the 2 o’clock position (right side) for Silage Bags, when standing facing the tunnel of the bagging machine.
Raise the bag loading cradle to the tunnel height. Clean off the top of the bagger tunnel so that bag will slide on easily. From each side of the cradle, push the bag onto the tunnel. (Some prefer to pull the bag onto the tunnel from the front. If this approach is used, it is best to pull on the blue cords rather than pulling on the bag). Make sure the bag is positioned as far forward as possible.
Lower the bag tray to the ground. Slide the lower part of the bag into the tray. Raise the tray to leave ¾” - 1 ½” (2 - 4 cm) spacing between the tray lip and the bottom of the tunnel frame. Remove the white cords that contain the folds.
Pull out 10-15 feet (3-5 meters) of the Hitec Bag starting from the bottom (where it will lie on the ground when filled), then from the side and finally from the top. Check with the bagging machine manufacturer for proper filling instructions. Attach the bungee cord over the tunnel and hook it on each bottom side under the tray. Bungee cord should be positioned so that the cord holds the bag folds onto the tunnel and only one fold at a time comes off.
Seal the open end with the rope provided in the box (candy wrap) or by sandwiching the film between two wooden planks or ideally with heat sealing.
Double check to see that the bag is not binding on the machine, that the tray gap is correct and that the fill bar is in position at about 10 o’clock.
Make sure you fill the bag evenly. When filling the Hitec Bag, use the bag fill bar (stretch bar) as a brake pressure setting
indicator. Use the ruler supplied in the bag’s box to measure the stretch levels while filling. The maximum stretch is 10%. The intent is to FILL the bag not to STRETCH the bag. The ruler’s red area represents stretching up to 10%; if the bags stretch bar exceeds the total length of the ruler, then the bag is over-stretched. Over-filling the bag in diameter will weaken the bag, cause it to be shorter in length and it will void the manufacturer’s warranty.
The red piece of tape near the end of the bag indicates that it is time to stop filling to allow for sealing the end. It is placed around 15’ (5 meters) from the end. Be sure to leave enough plastic to allow for closing of the bag and hooking onto the unloader (for Grain Bags).
After filling, seal the open end using the same procedure as used on the beginning end. Grain bags should be sealed as soon as possible. Silage bags can be left open on one end for 48 hours after filling so that the gas created in the bag can exit. Alternatively, seal the silage bag right after filling, on day 2 make a small slit on each end of the bag and leave them open for 24 hours so the accumulated gas can exit. Please stand back when making the slits and do not breathe in the gas. Use the provided repair tape to seal the slits on day 3.
Grain spilled during filling must be removed from around the bag as it attracts pests (insects and rodents). Regularly check the bag for any damage from birds, rats, deer, foxes, etc. Repair the damage immediately with the approved bag repair tape (included in the box).
Take care when opening the bag before extraction so that it doesn't "zipper" down its entire length. Before making any vertical cuts, make a small horizontal cut first. This should be made 1' off-center, avoiding the tight points of the bag. Then make a vertical cut, starting from the horizontal one until the end of the bag. You are now ready to mount the bag on the unloader.


